Basketly Flutter App UI Template
This document helps you install, run, customize, and connect Basketly to your own backend. It is written for buyers who want a clean handoff and a practical starting point for a production-style grocery delivery customer app.
Table of Contents
- Package Overview
- Screen Previews
- Requirements
- Installation & Getting Started
- Production Build Guide
- Project Structure
- Navigation Flow Map
- Customization Guide
- Logo, Splash, and Display Name
- Backend Integration
- Backend / Server Troubleshooting
- Backend / Server FAQ
- Included Screens
- Assets and Images
- Release Notes for Buyers
- Support
Package Overview
Basketly is a customer-side Flutter UI template for grocery delivery, quick commerce, supermarket, and local essentials apps. It includes onboarding, authentication, shopping, checkout, live order tracking, customer profile management, and support-related screens.
BasketlyDefault package name / bundle identifier:
com.basketly.appPackage version in
pubspec.yaml: 1.0.0+1
The project is designed so you can start with mock data for presentation and then replace the mock service layer with your own REST API, custom backend, or app platform integration.
Screen Previews
The preview images below show the key customer app flows included in Basketly. They help buyers quickly understand the visual style before running the Flutter project.
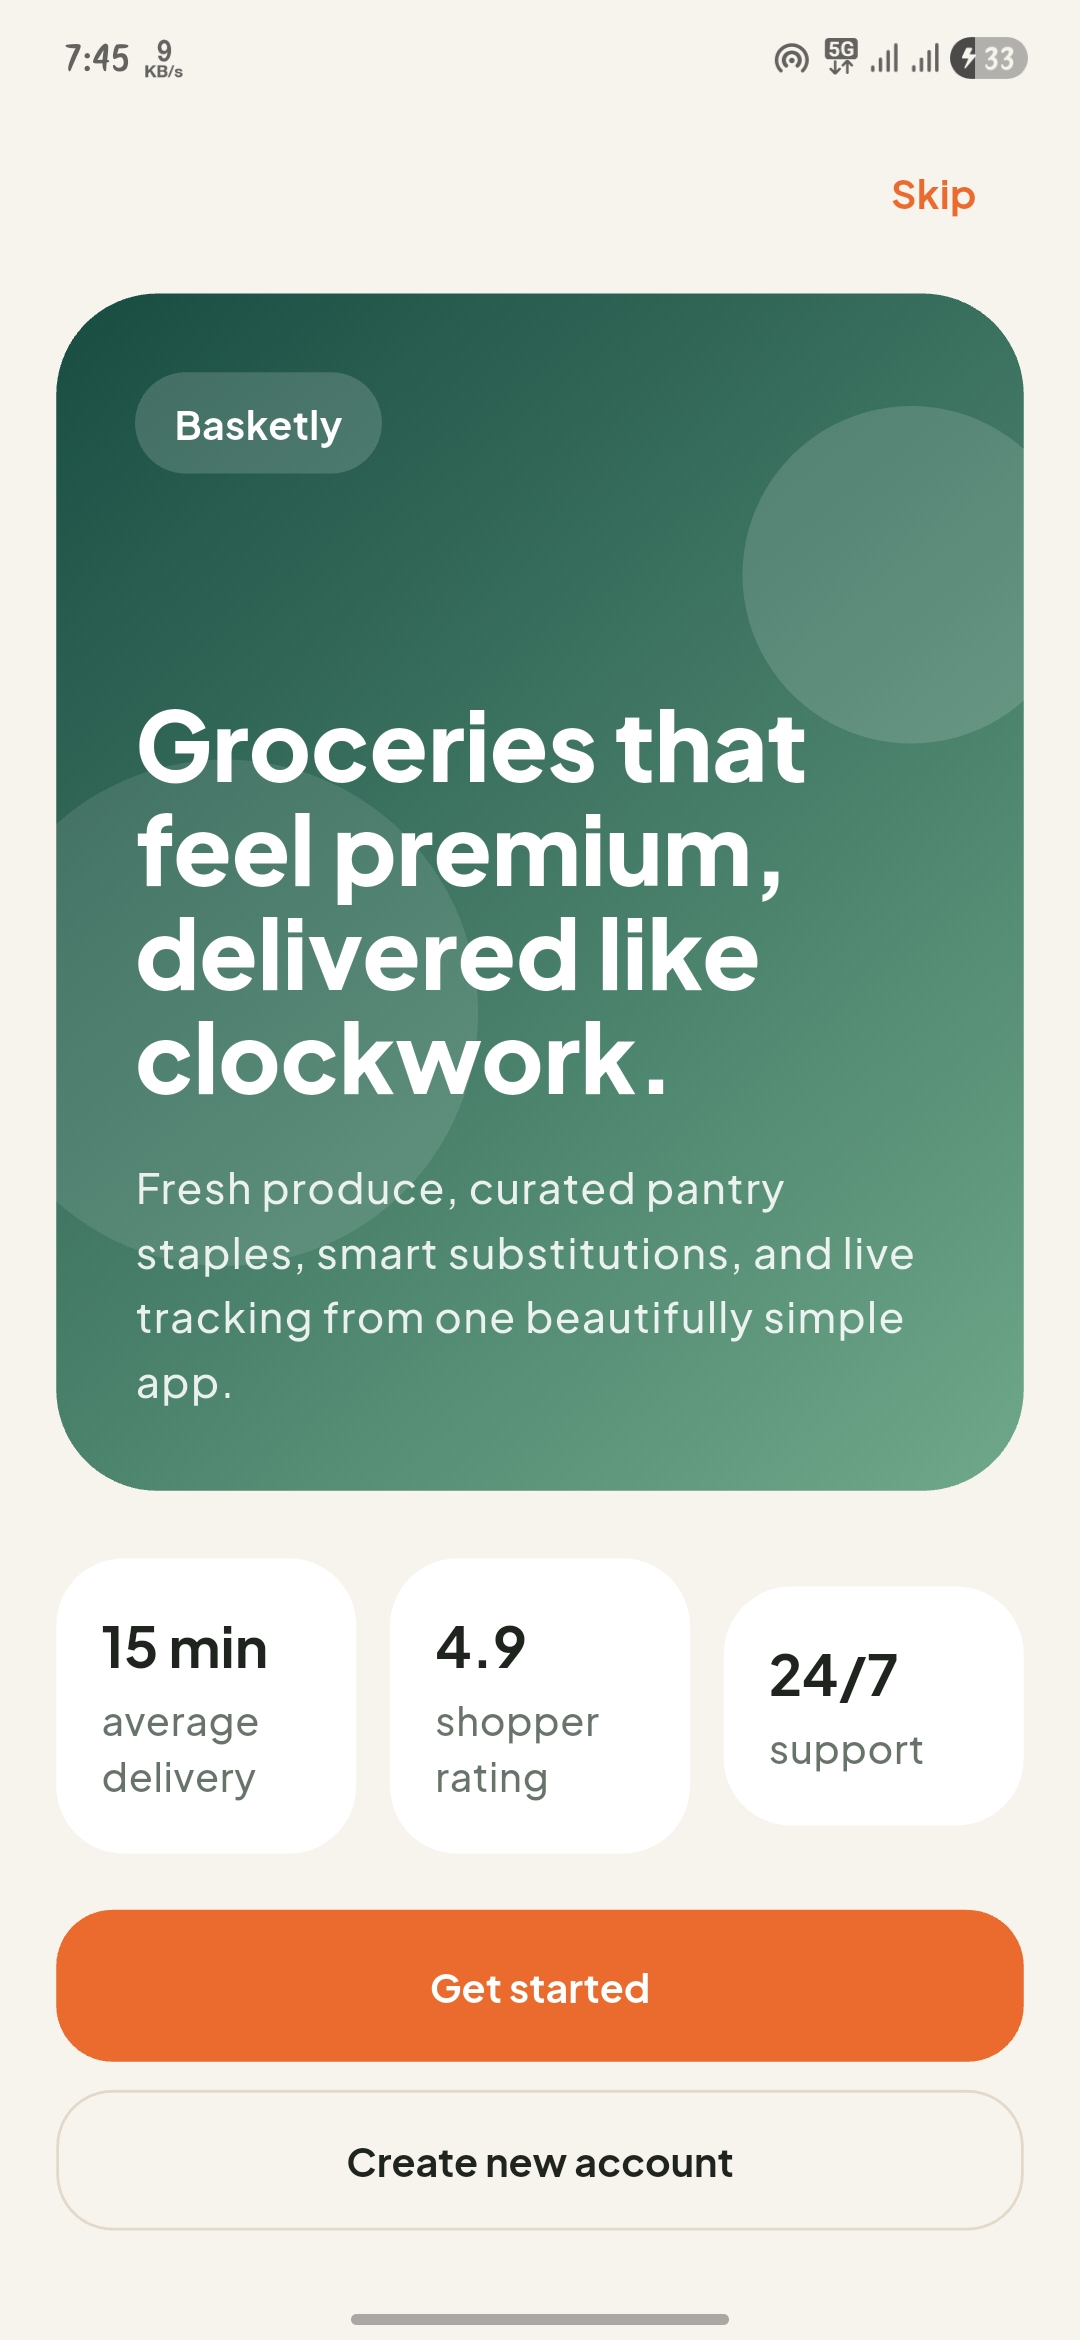
Onboarding
Launch screen with premium grocery positioning and account entry actions.
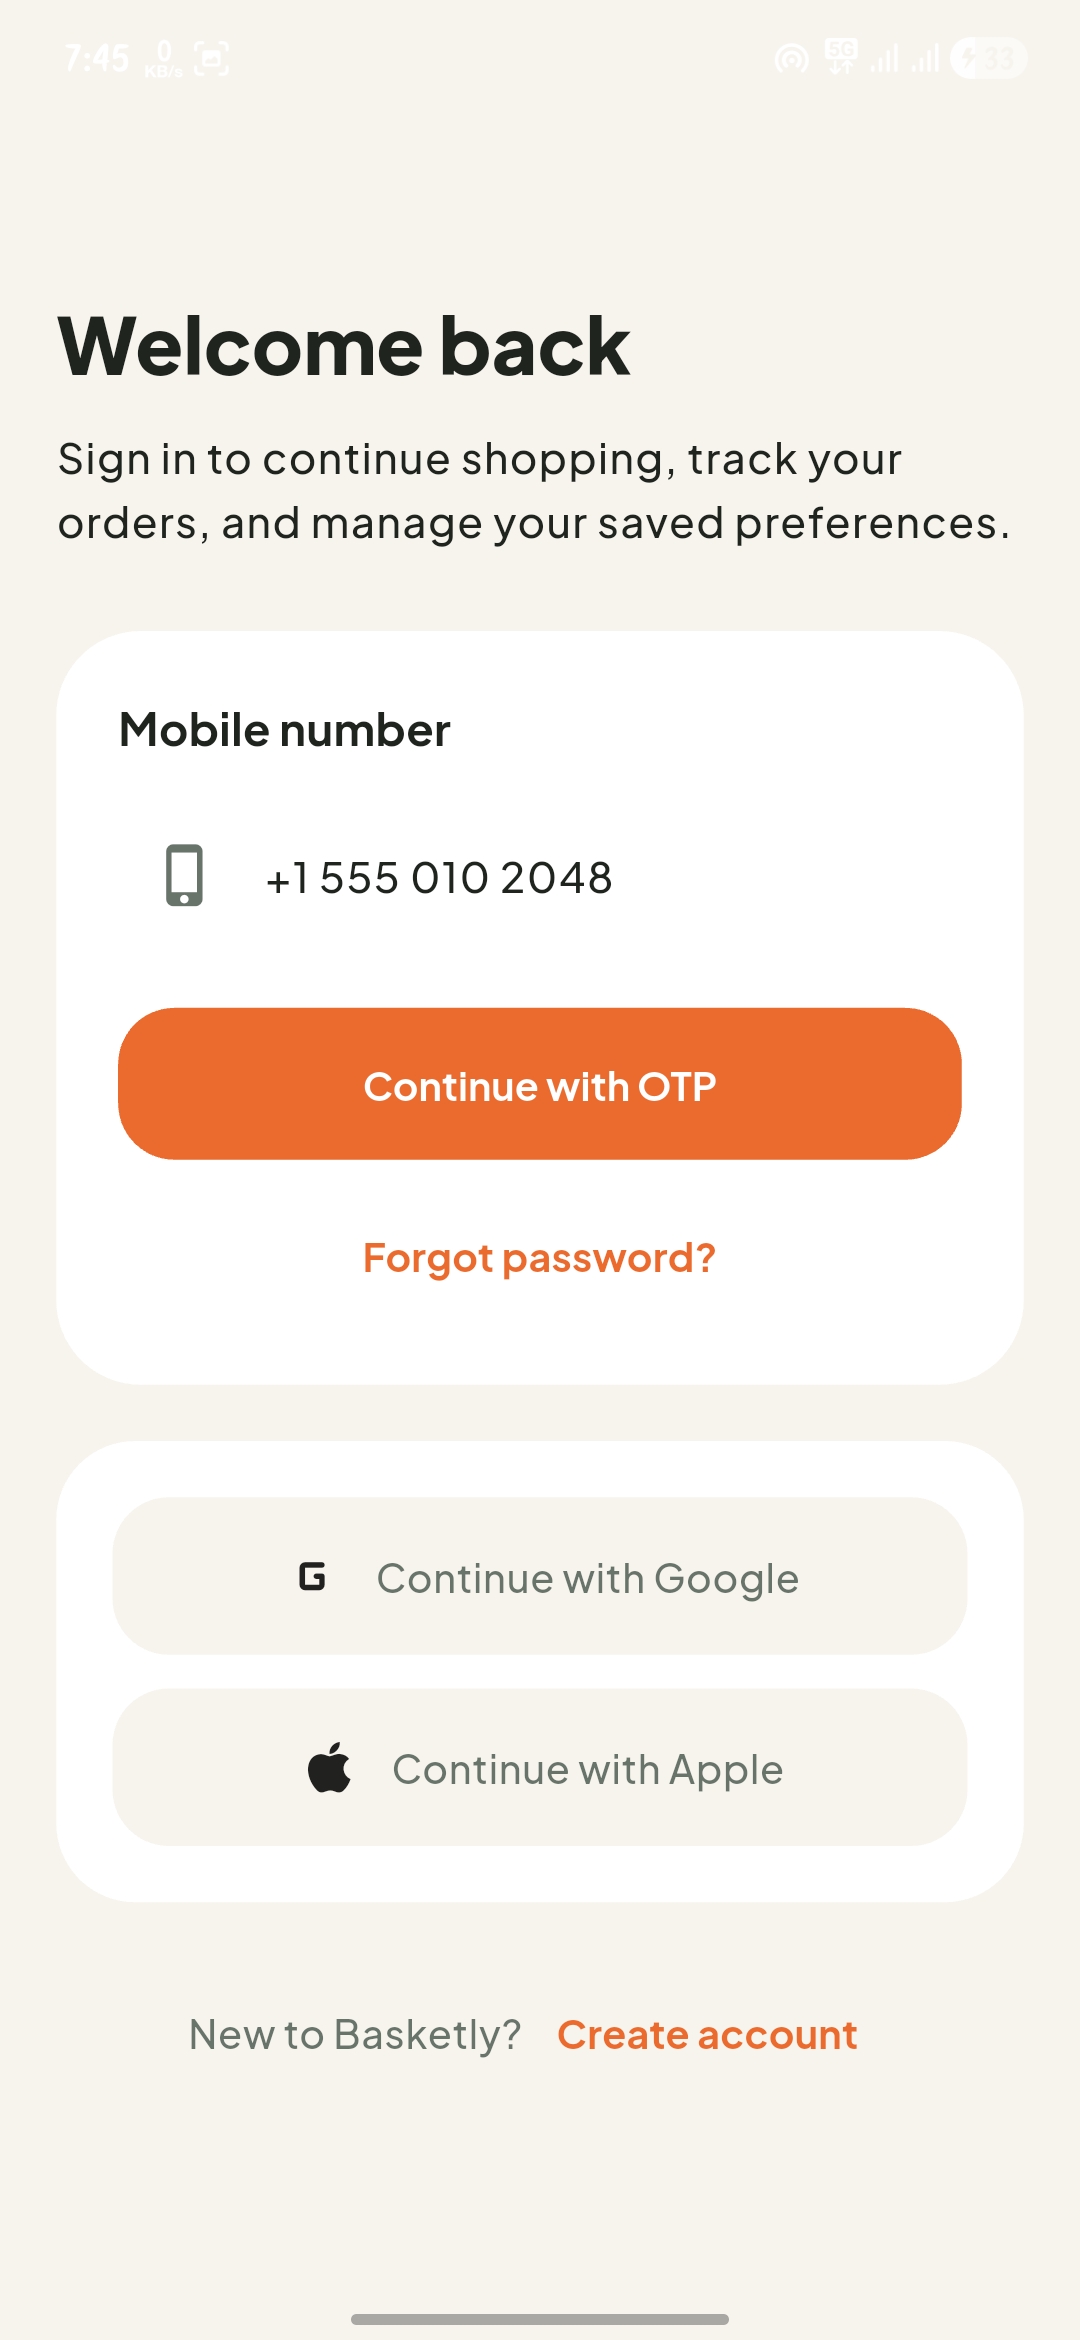
Login
Returning customer sign-in screen with phone-based entry flow.
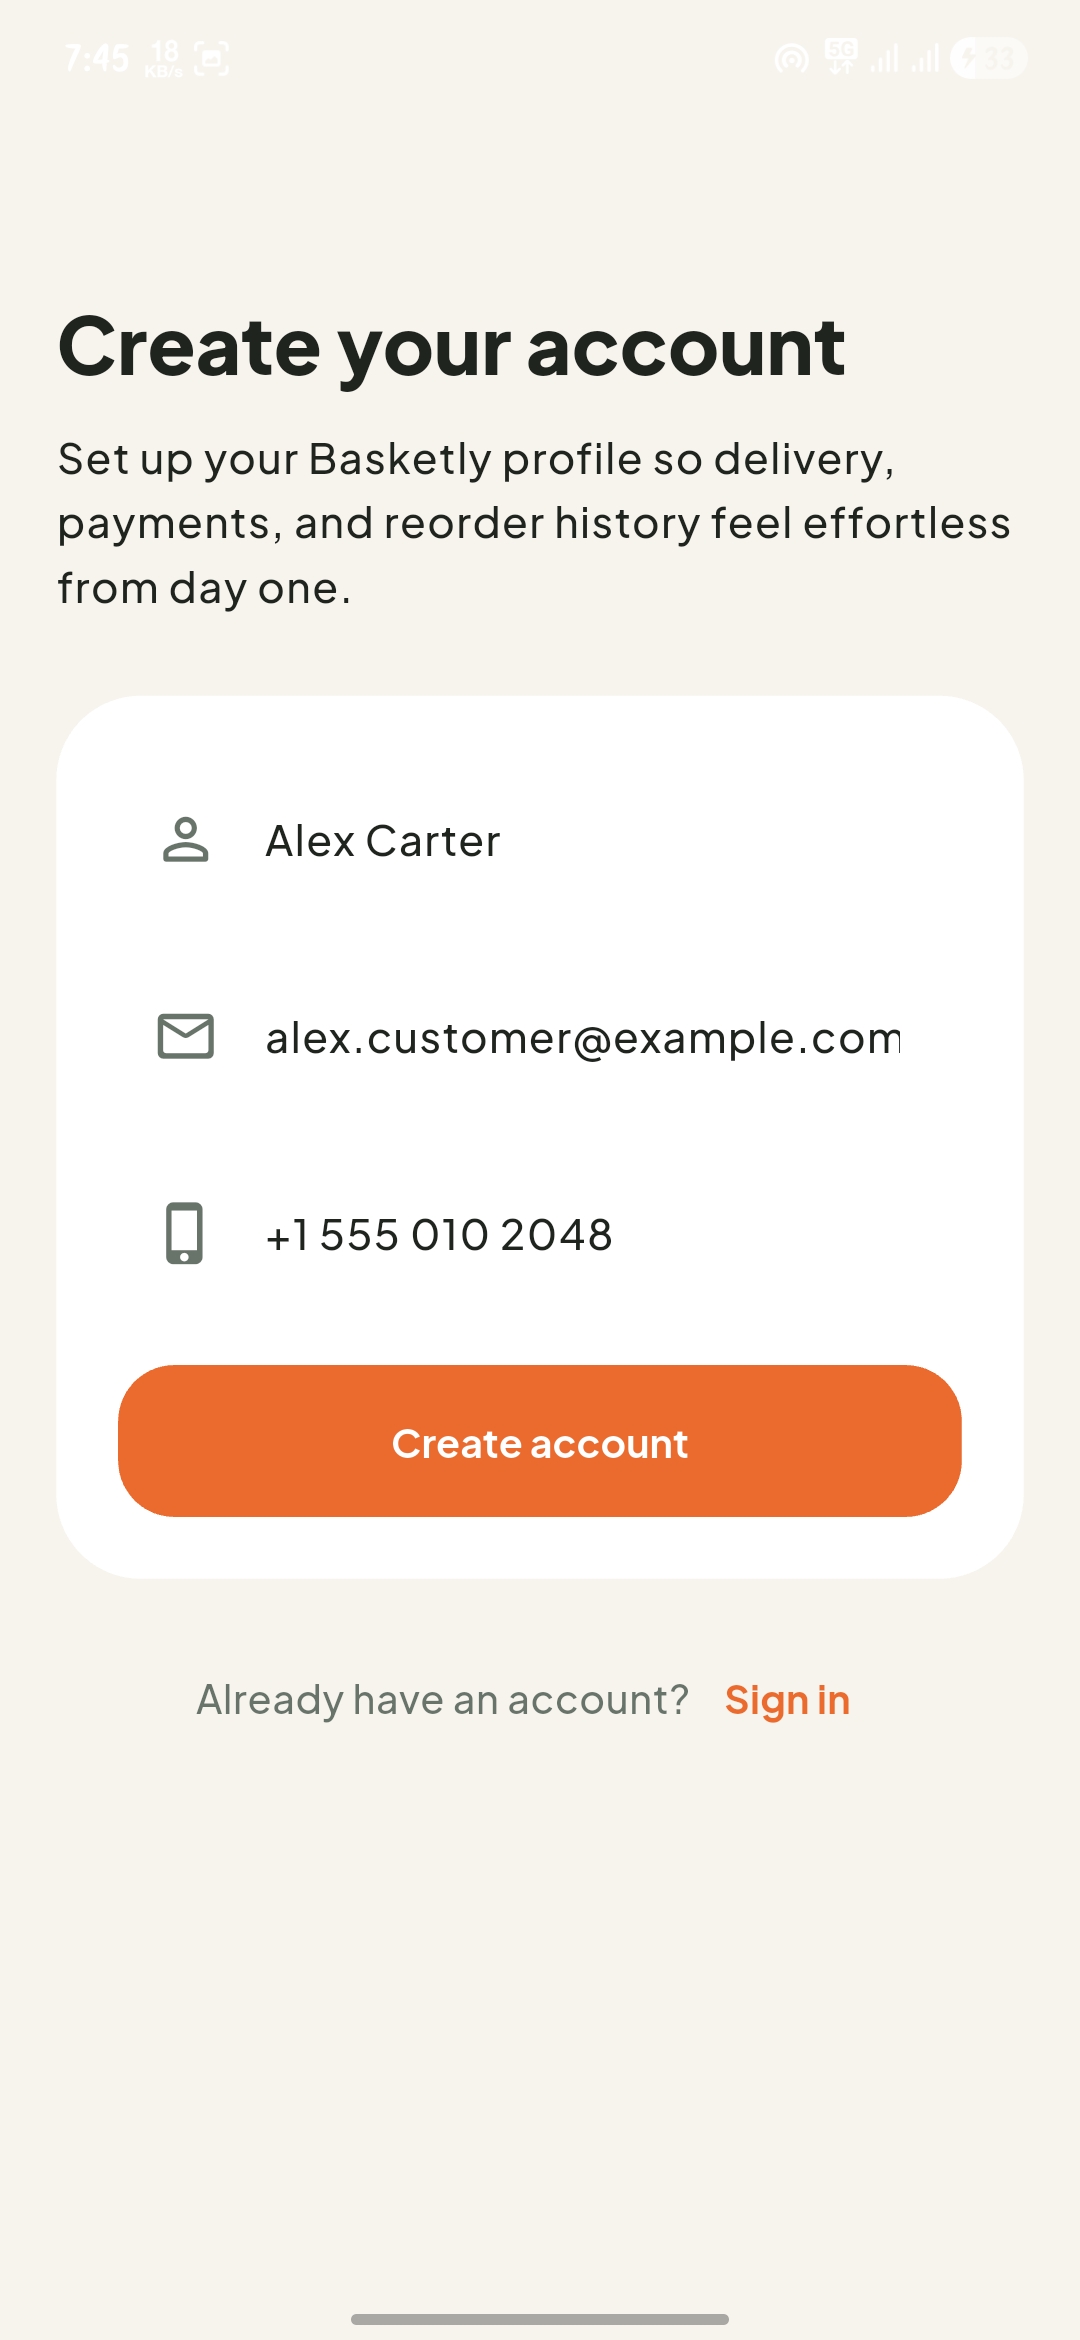
Create Account
Registration screen for new customers entering the app for the first time.
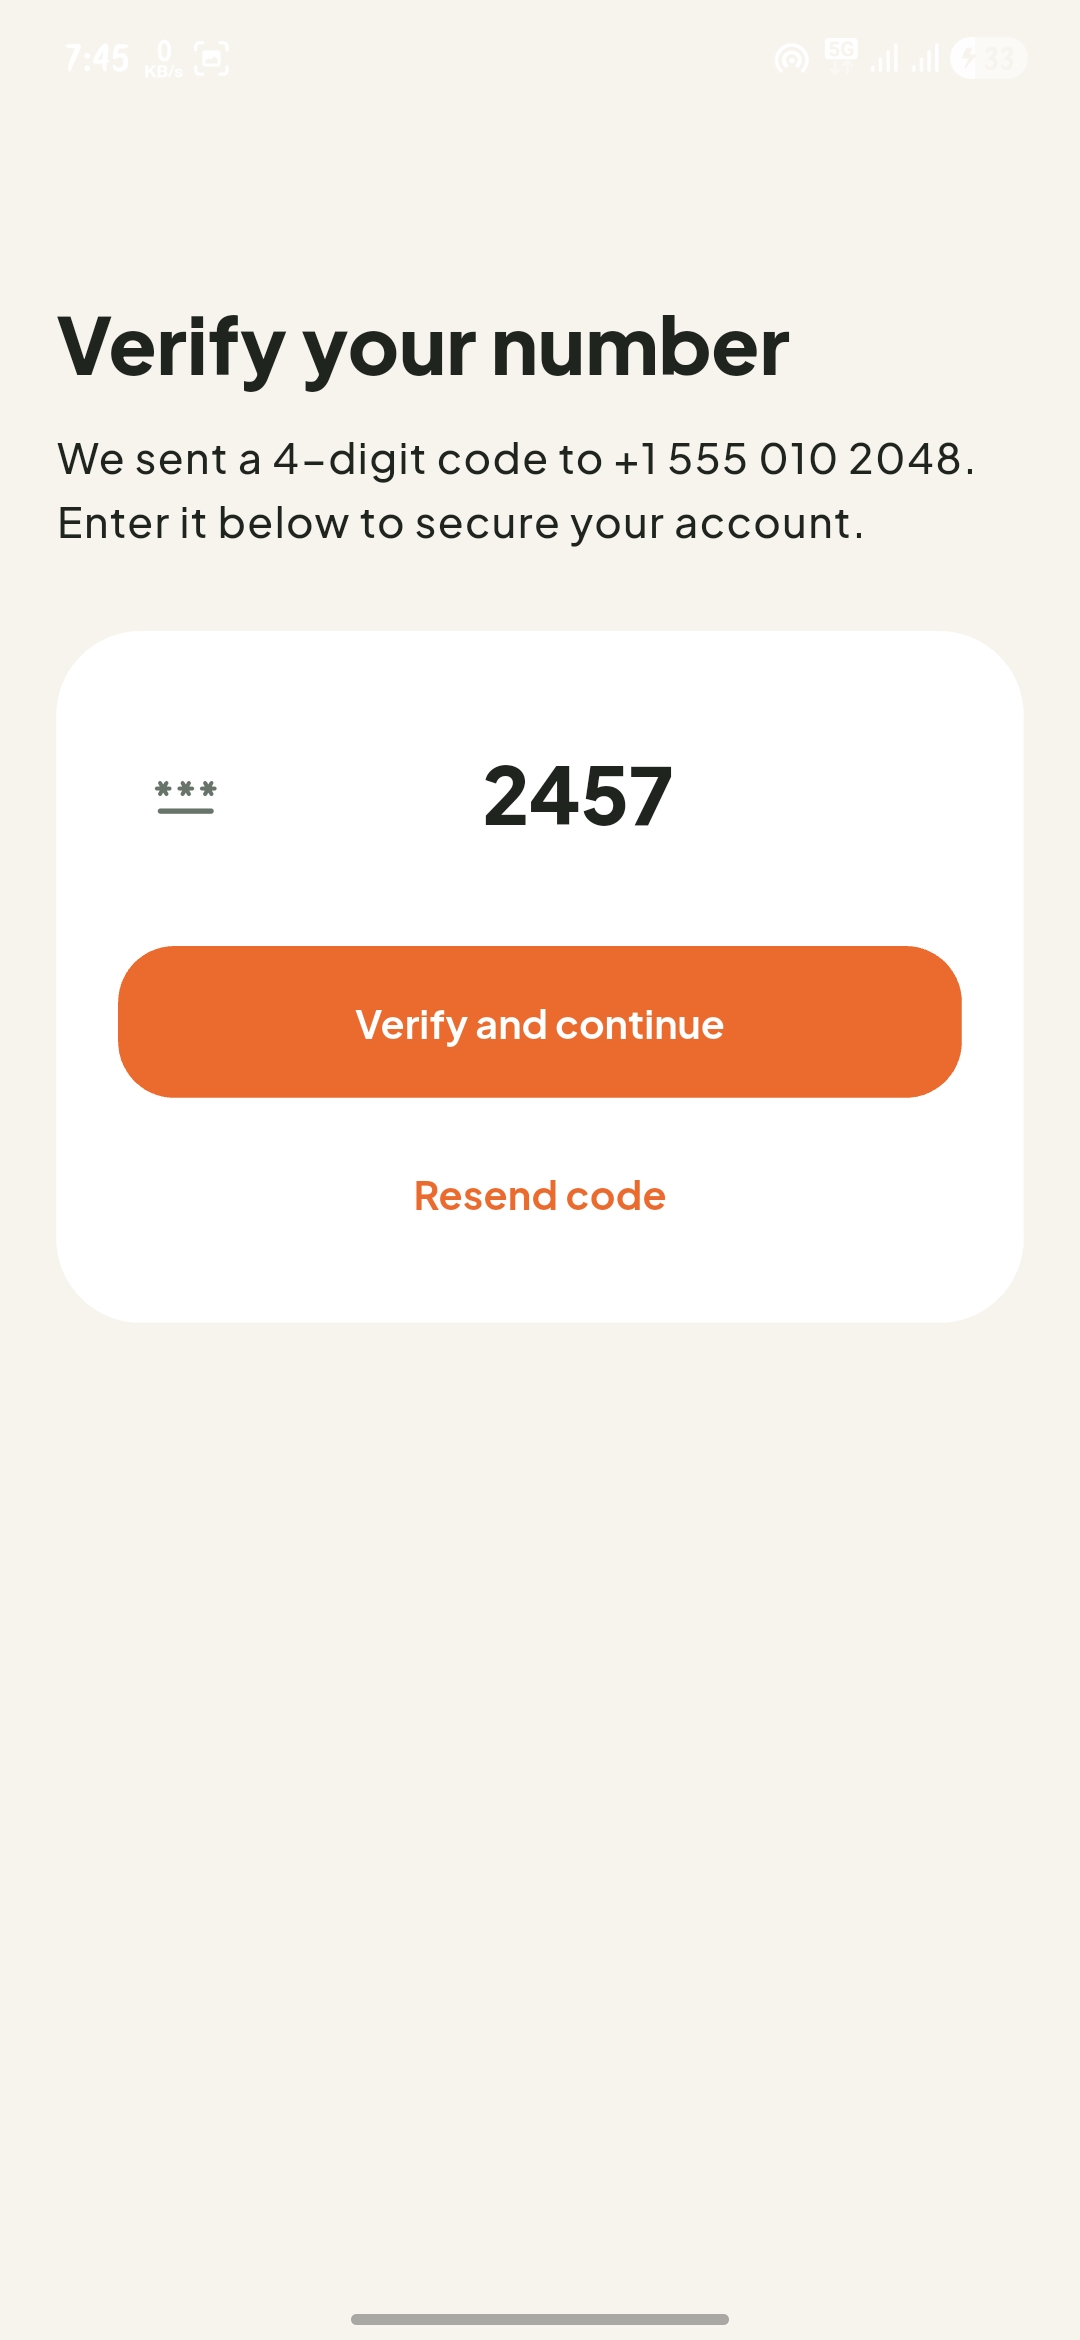
OTP Verification
Verification step used before entering the customer shopping experience.
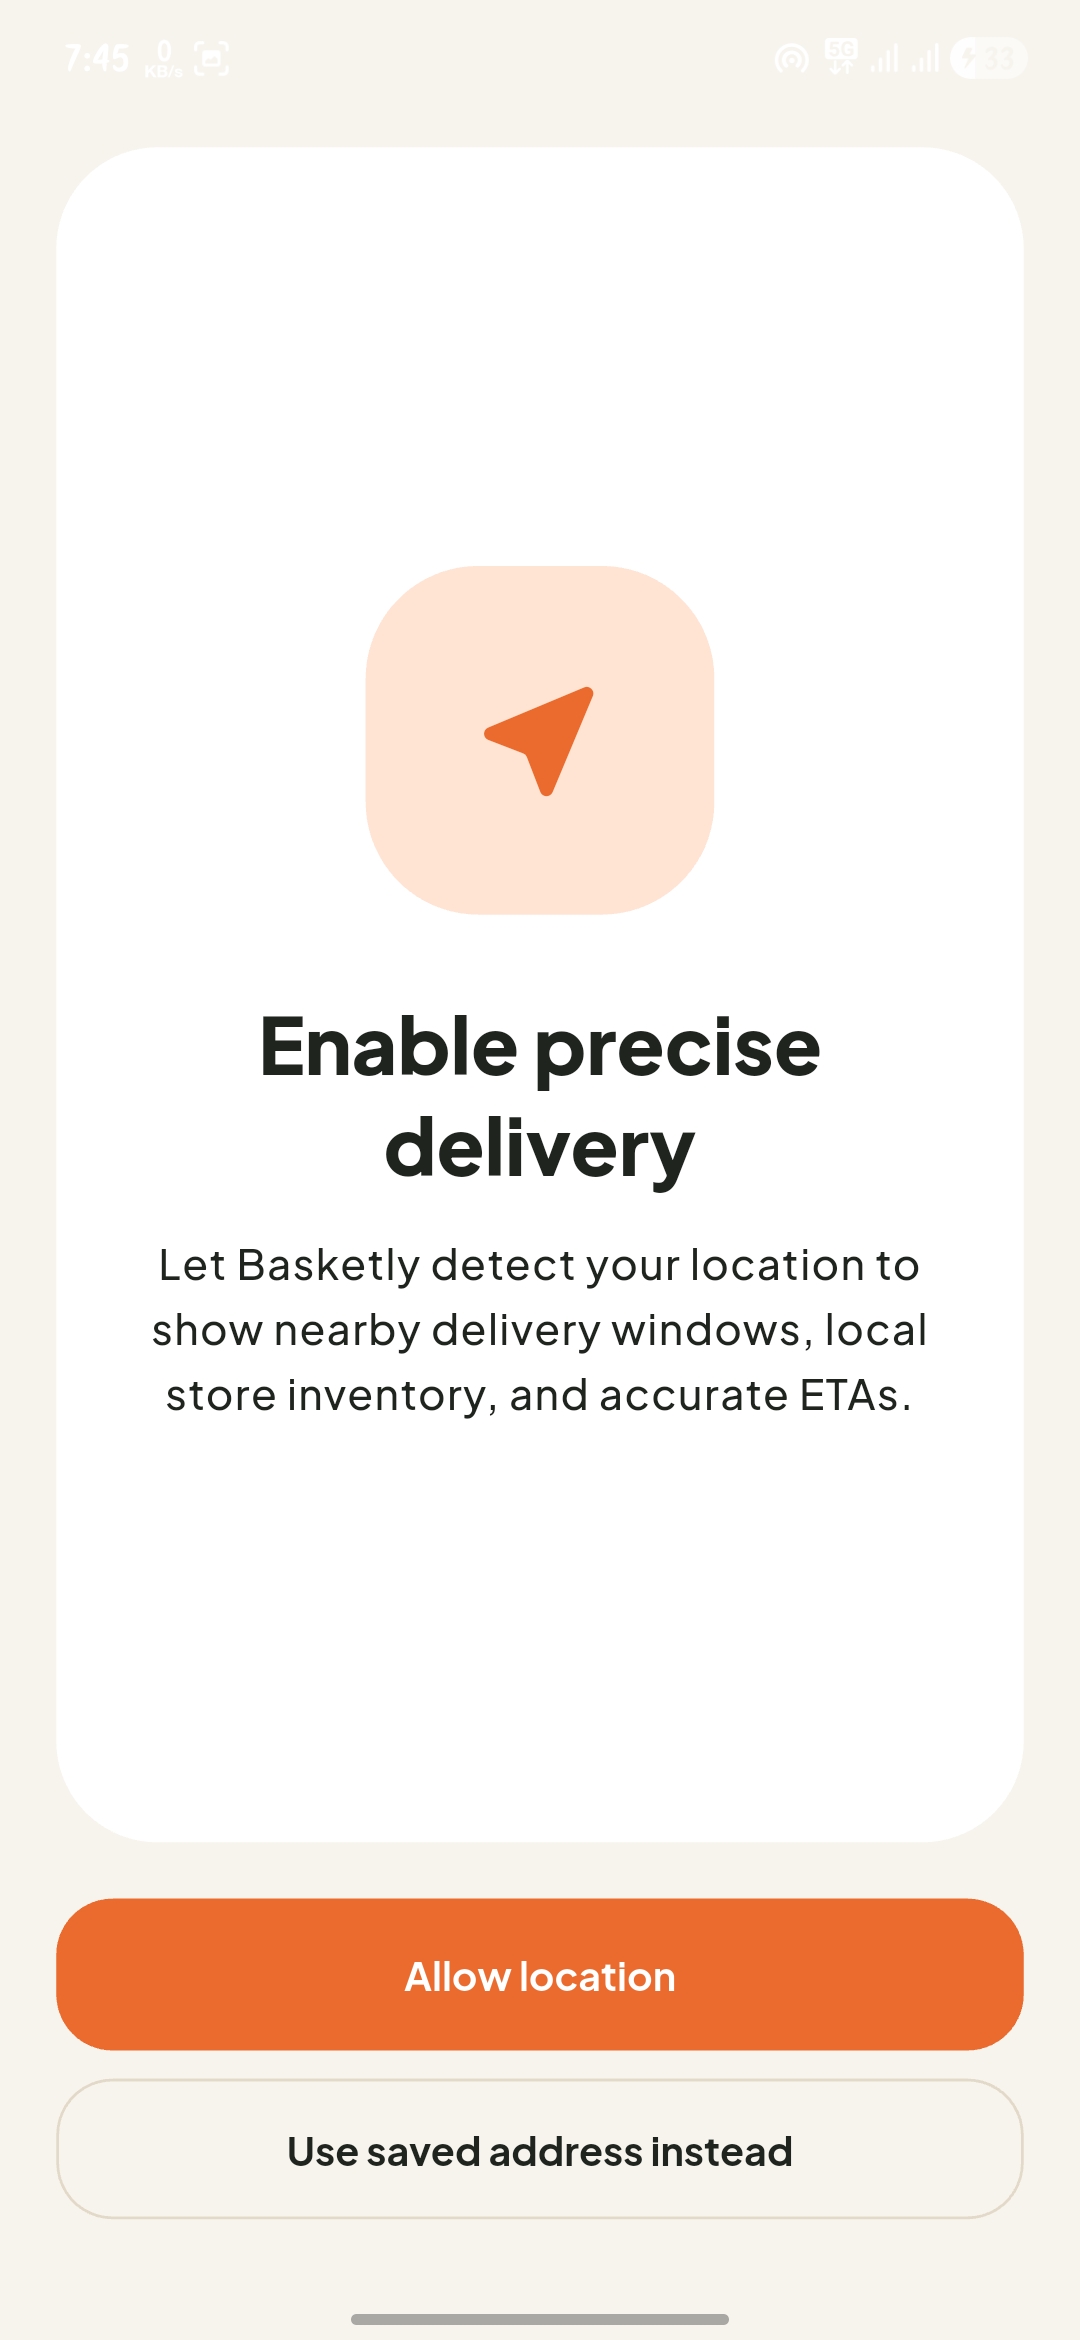
Location Permission
Location access prompt for delivery address and nearby grocery availability.
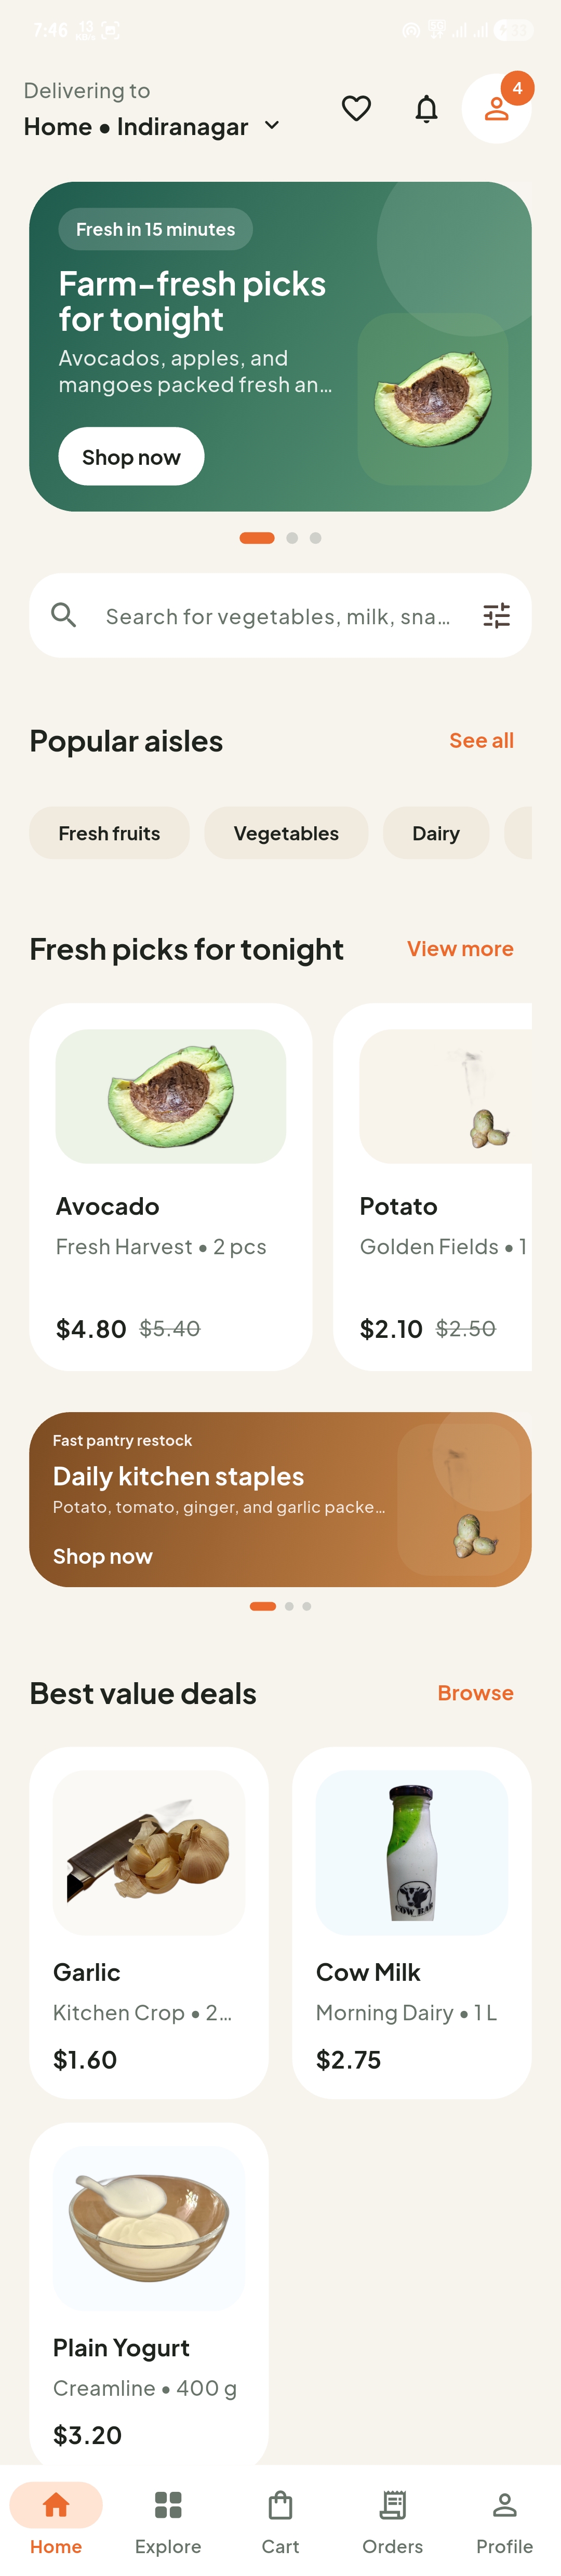
Home
Featured promotions, search entry, categories, and popular products.

Category
Category filters and product cards for browsing grocery items.
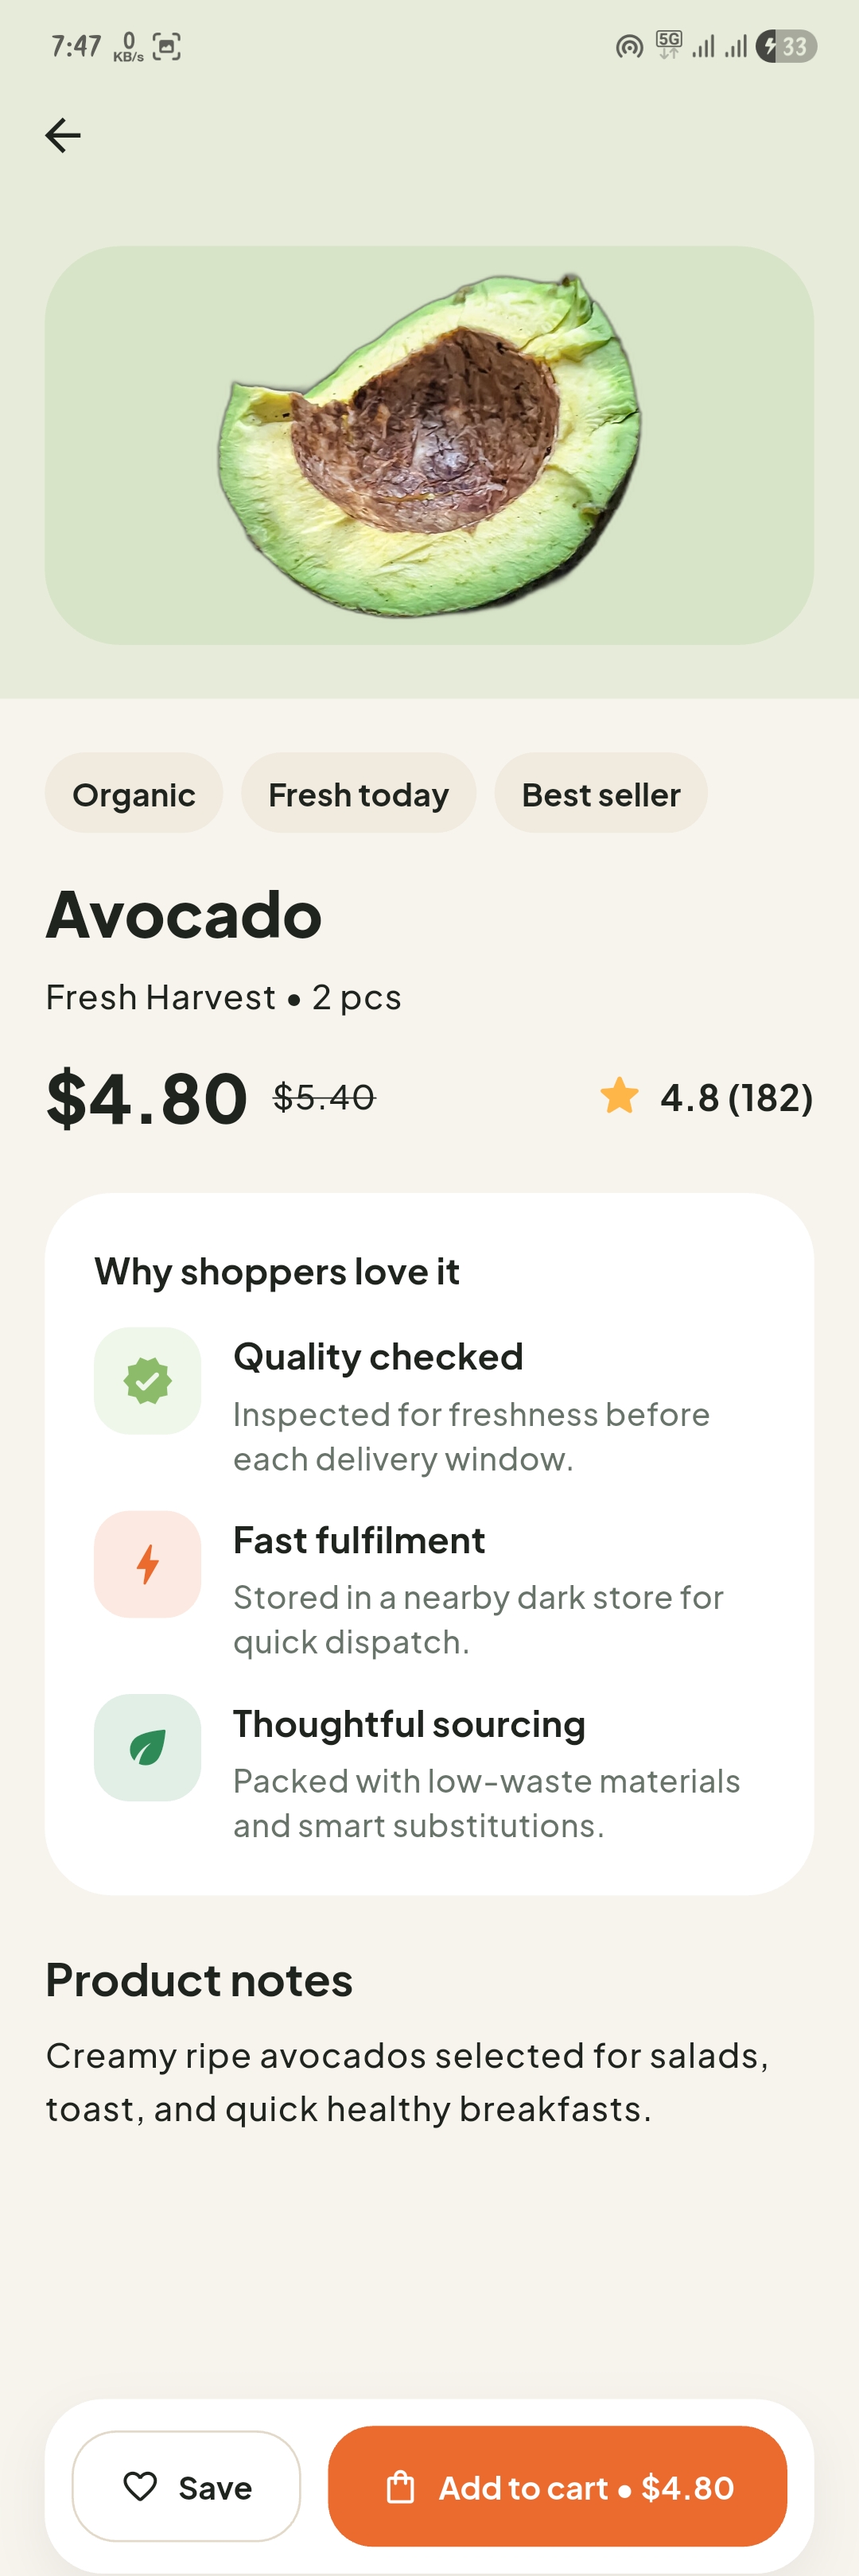
Product Details
Product information, pricing, quantity controls, and add-to-cart action.
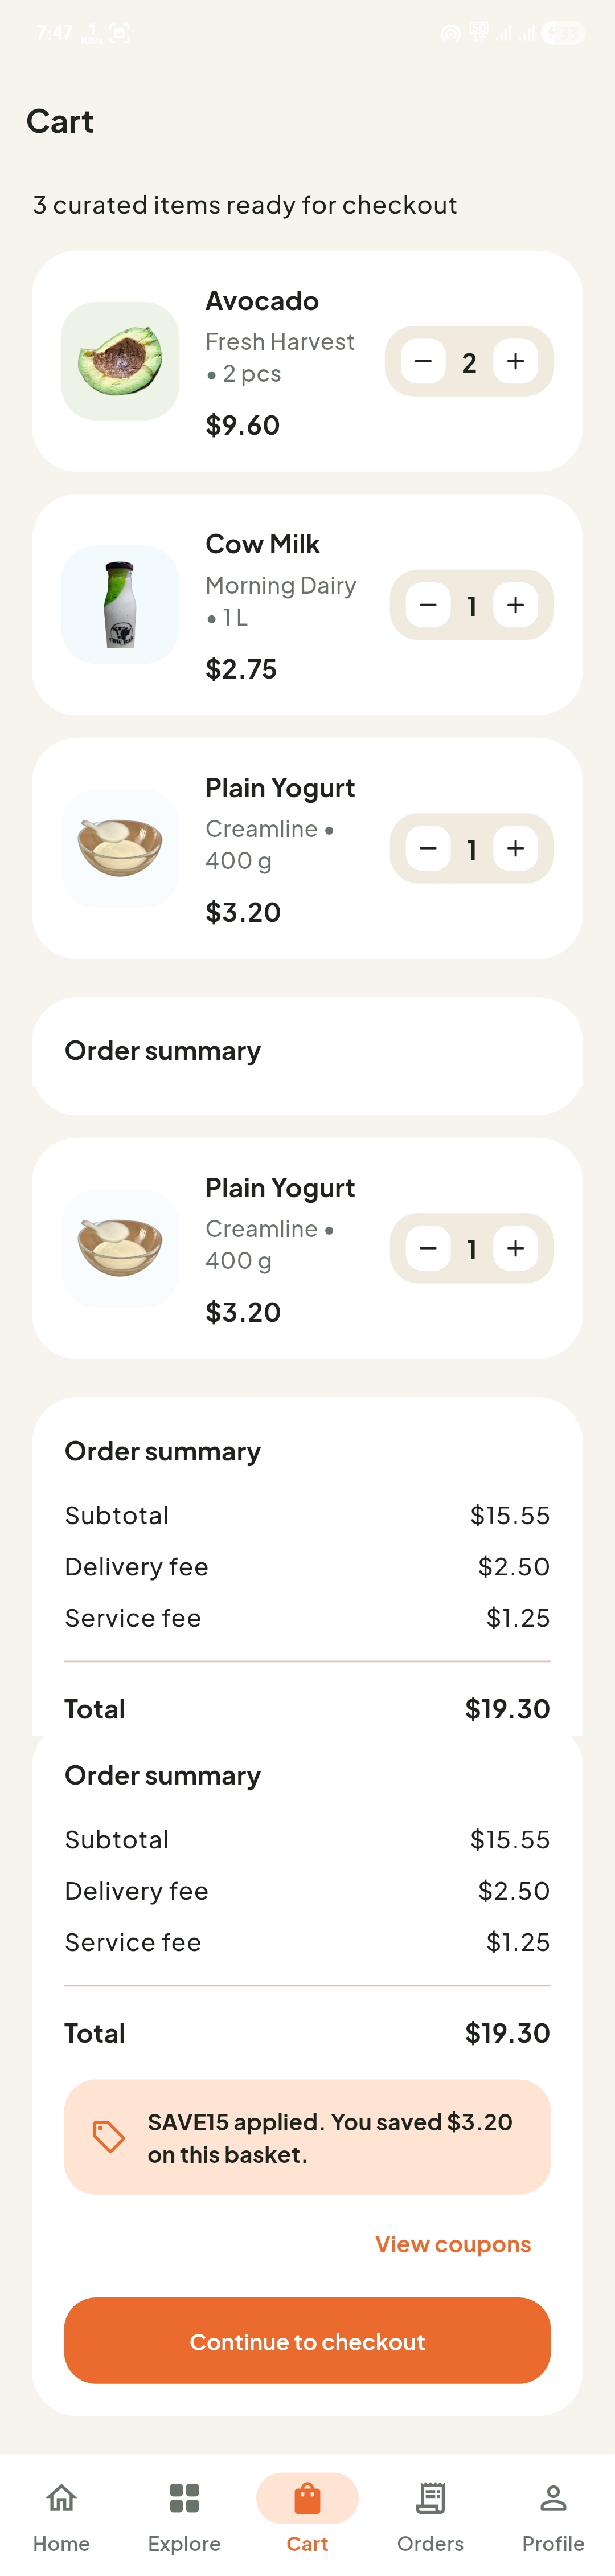
Cart
Cart items, quantities, coupons, and order total before checkout.
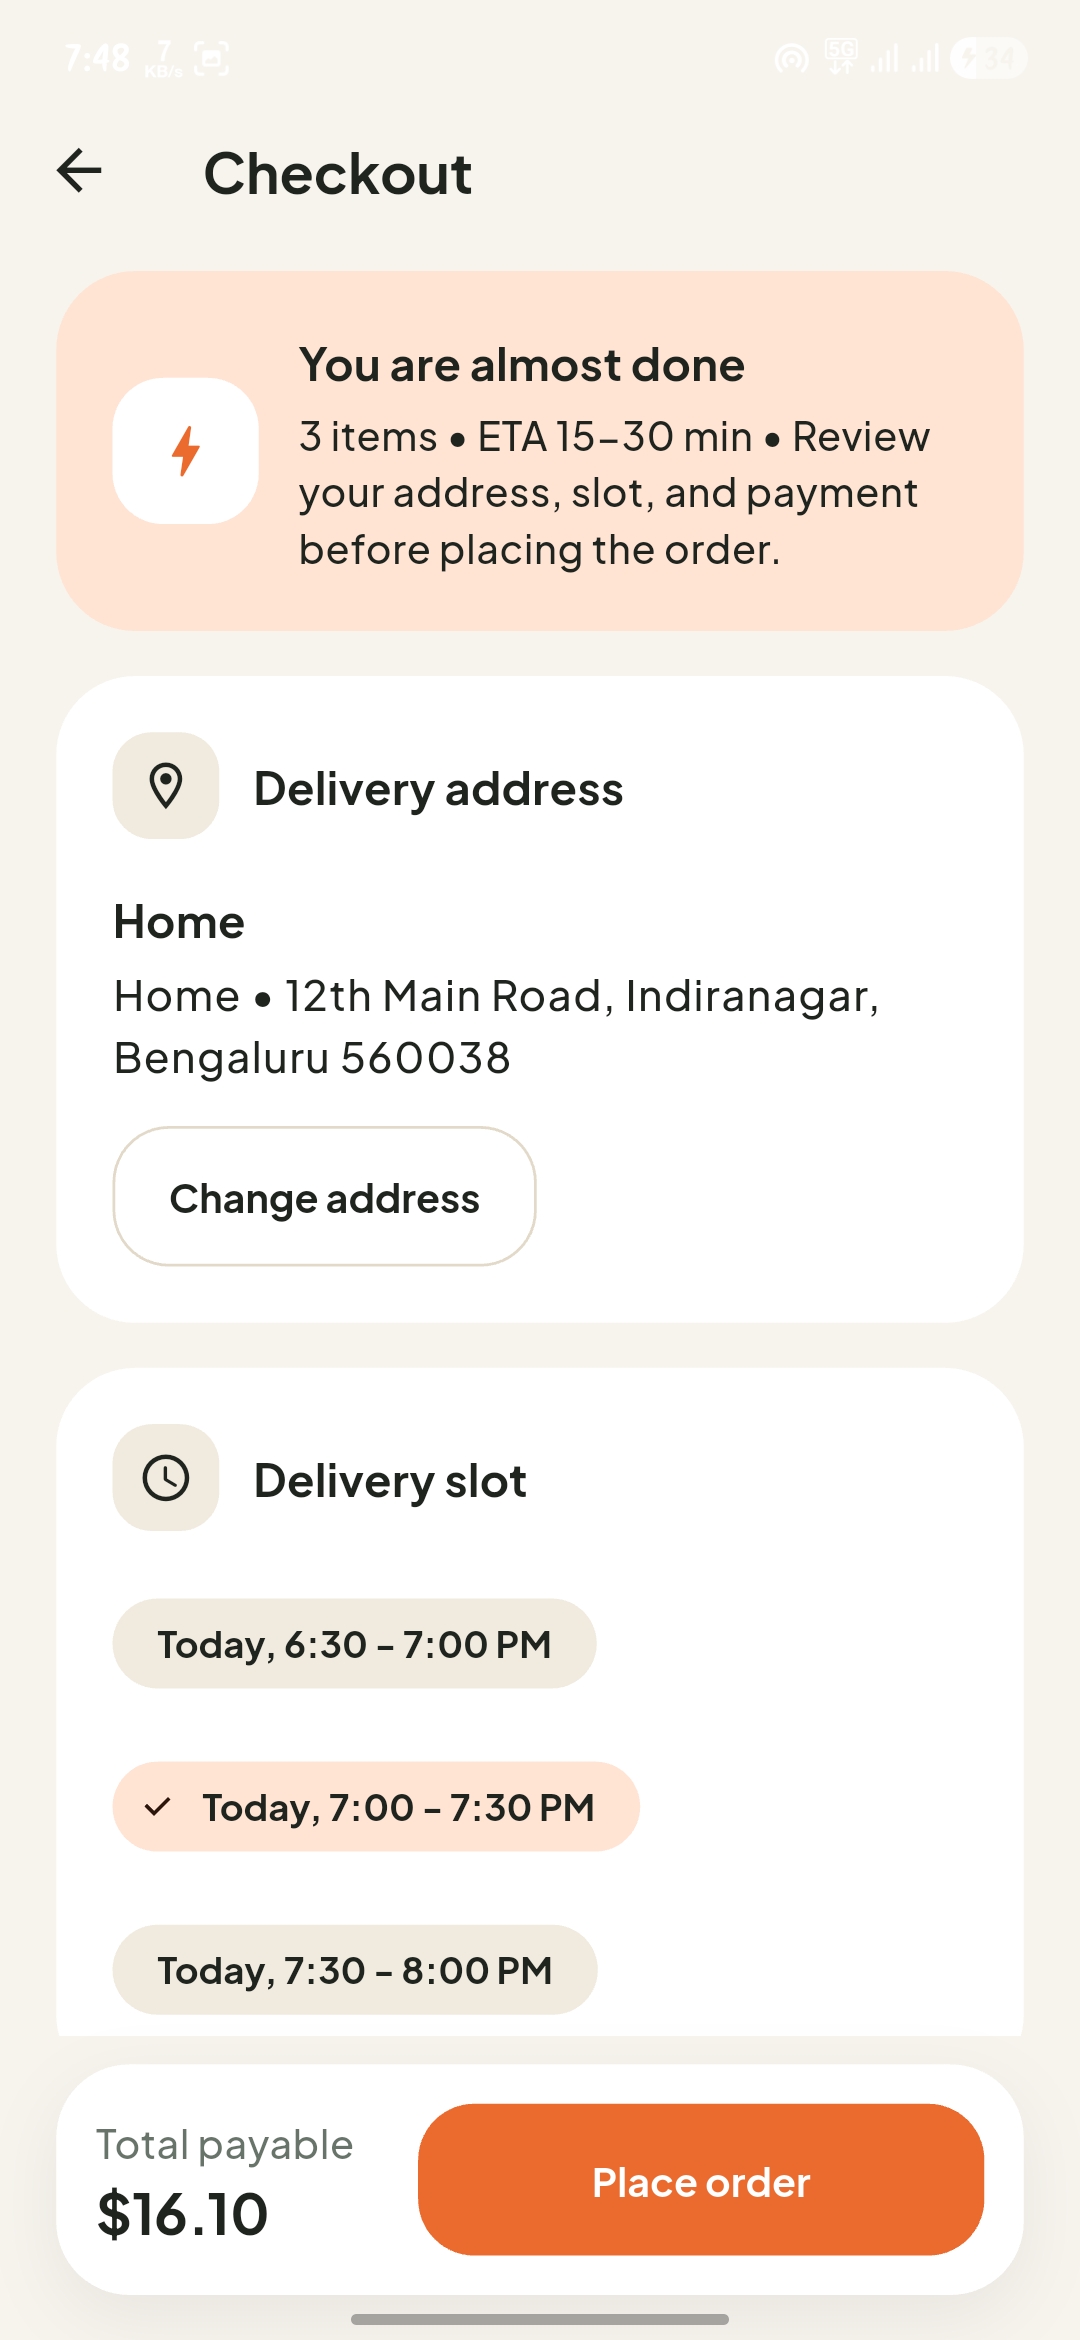
Checkout
Delivery address, payment method, summary, and order placement flow.
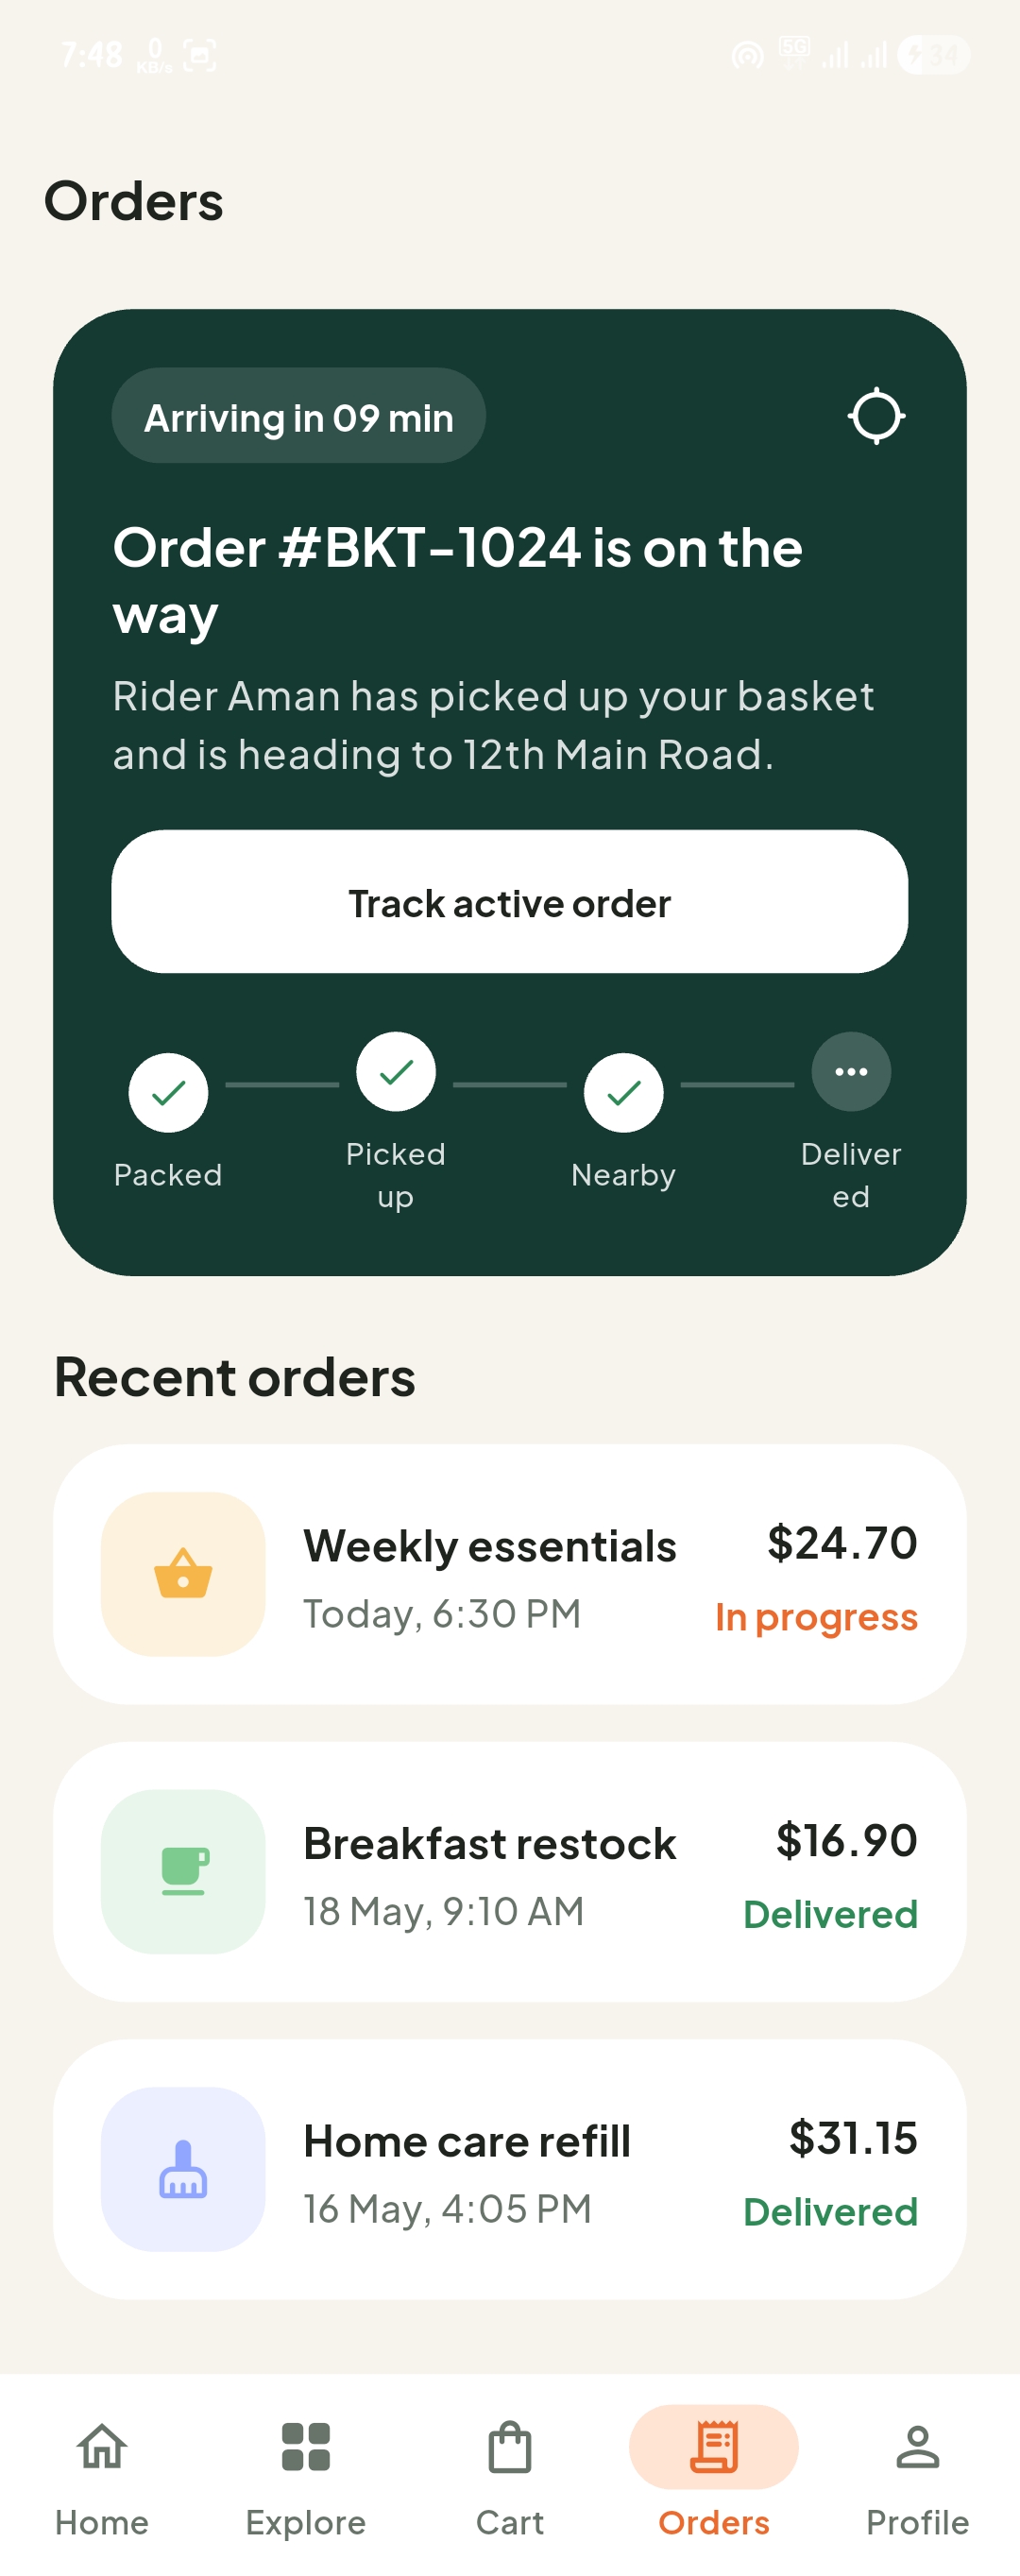
Orders
Active and previous order overview for customer order management.
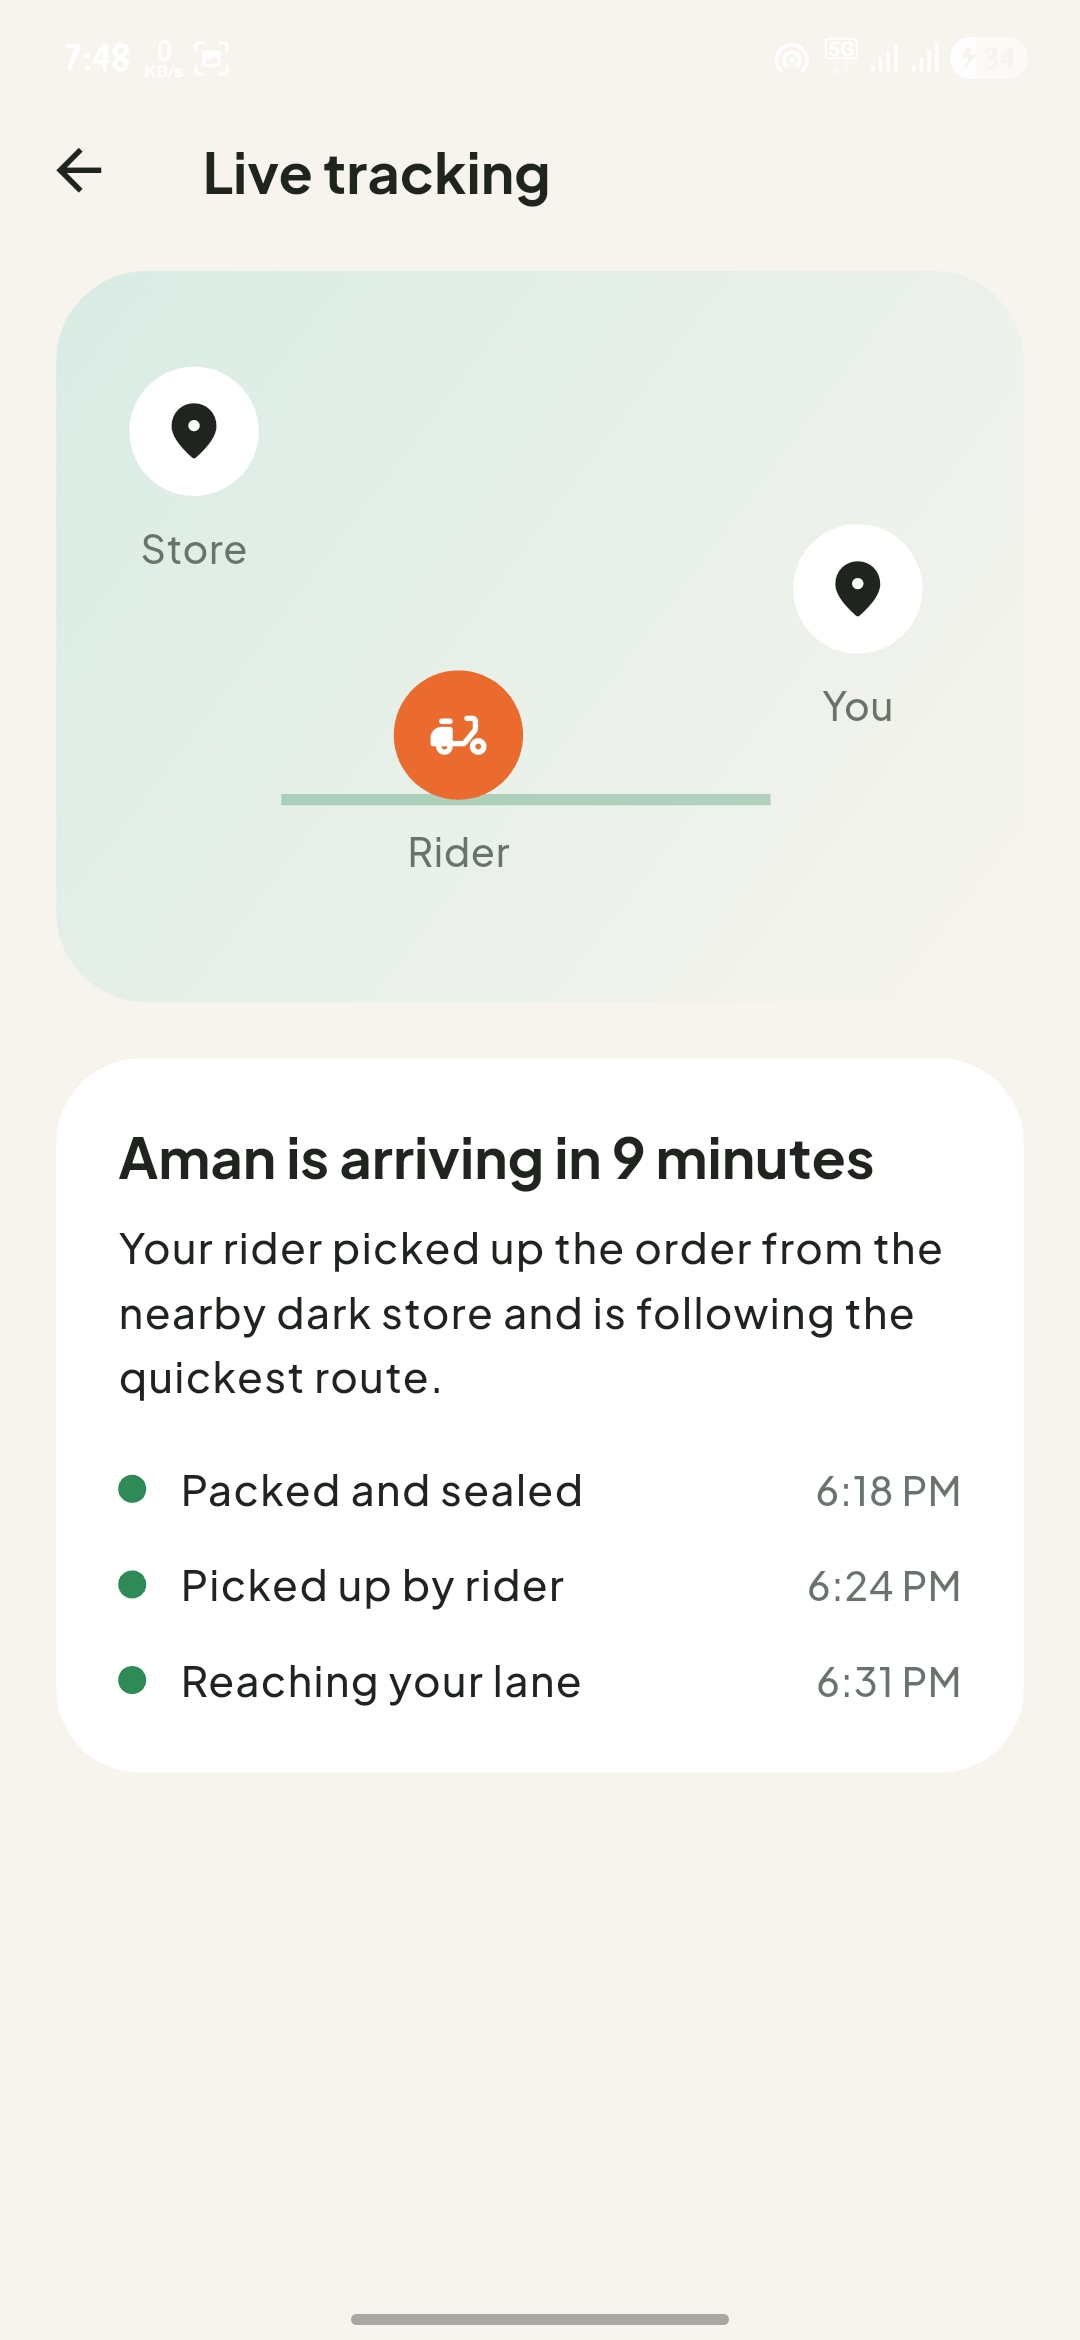
Live Tracking
Order progress, delivery route preview, and rider contact actions.
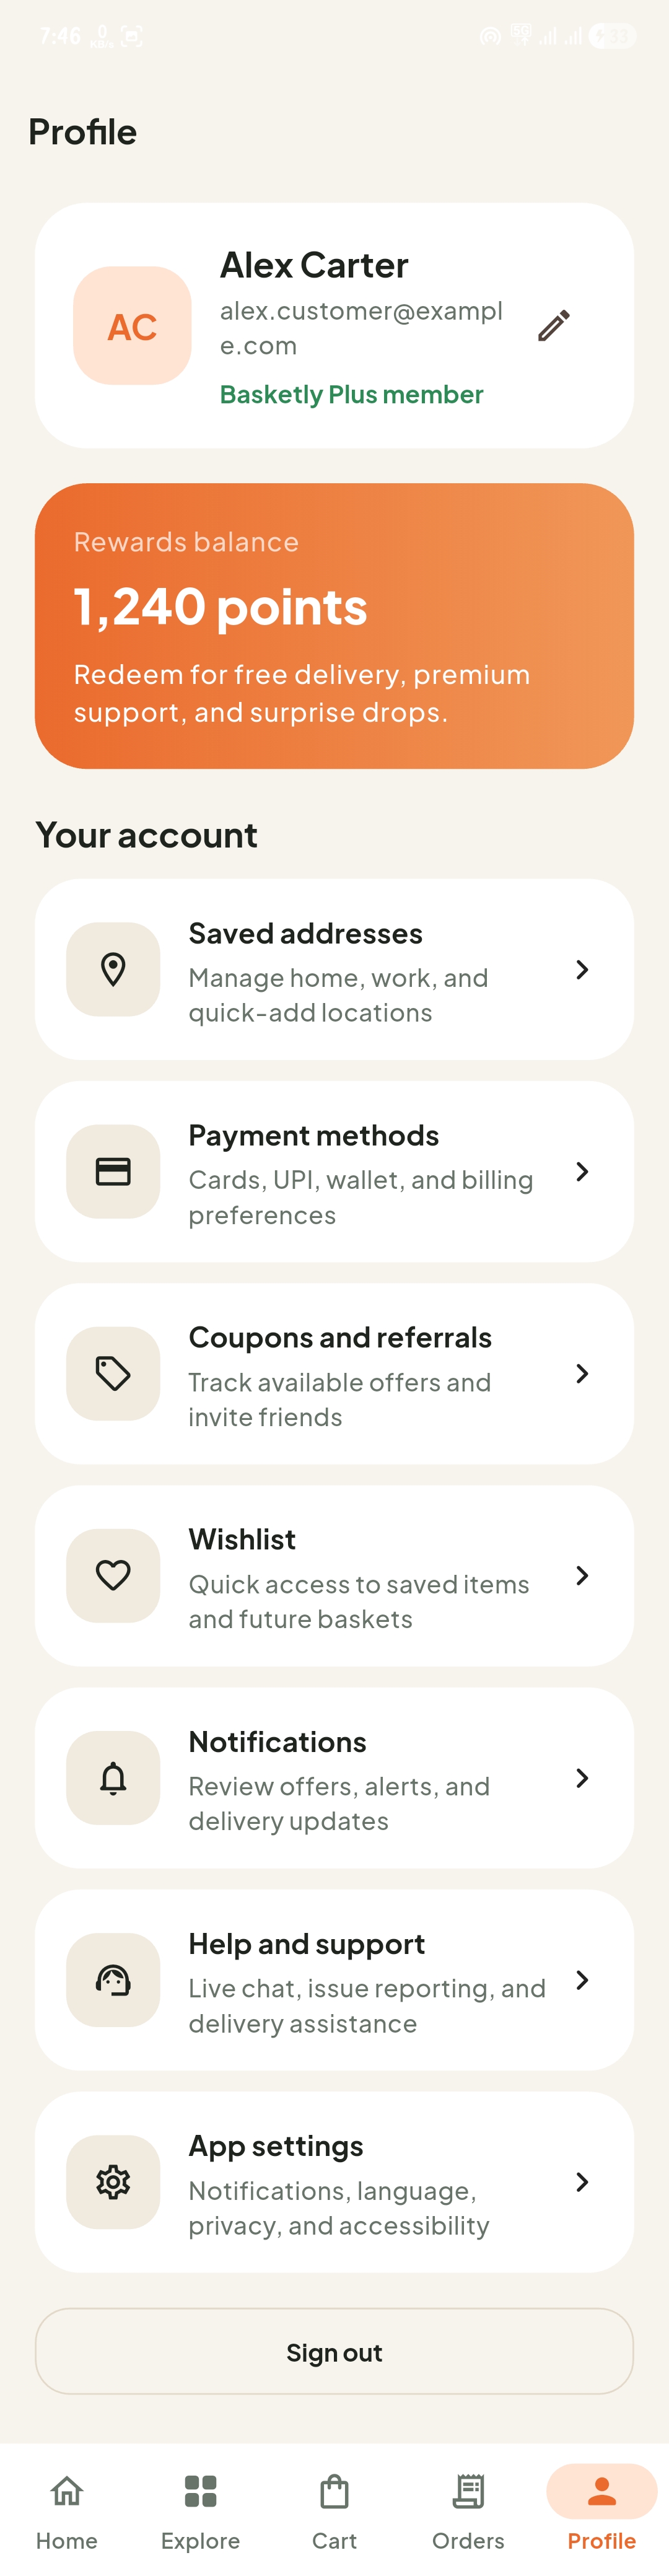
Profile
Account management, addresses, payments, coupons, support, and settings.
Requirements
- Flutter SDK compatible with the project environment
- Dart SDK compatible with
sdk: ^3.9.2 - Android Studio, VS Code, or another Flutter-supported editor
- An Android emulator, iOS simulator, or a real device
Dependencies Used
cupertino_iconsgoogle_fonts
Installation & Getting Started
Follow these steps in order. They work whether you're a developer setting up the project for the first time or a non-technical buyer just previewing the app before handing it to a developer.
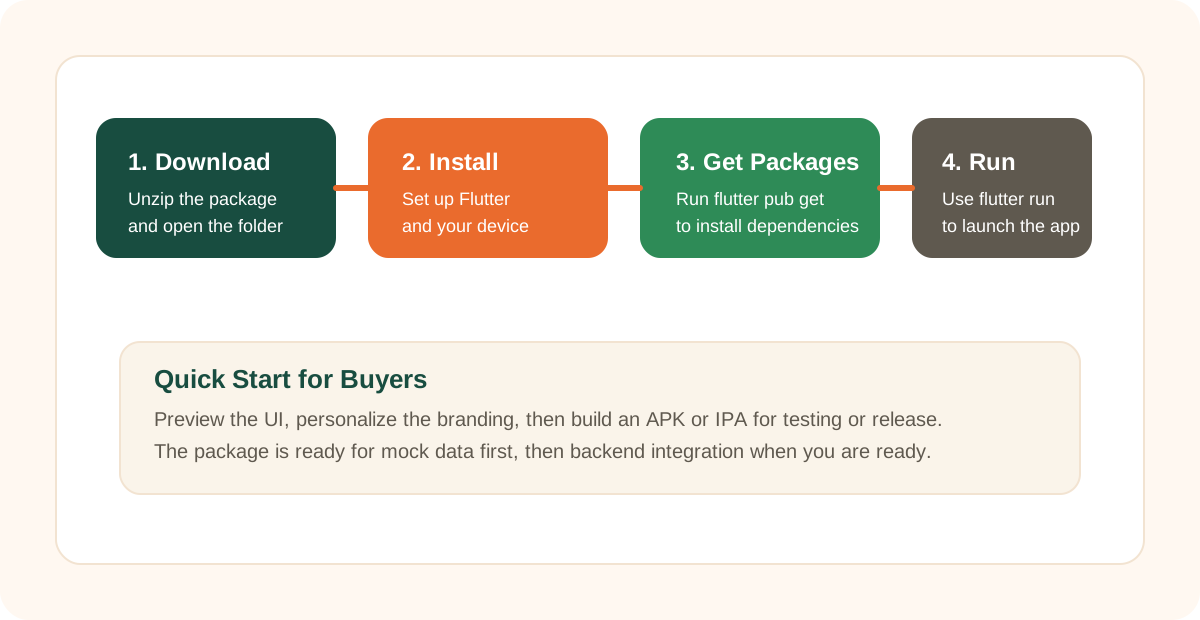
Step-by-Step Commands
- Download and extract the purchased package.
- Open the extracted project folder in your Flutter editor (Android Studio, VS Code, or similar).
-
Set up the Flutter SDK if it isn't installed yet:
- Download the Flutter SDK for your OS from
docs.flutter.dev/get-started/installand extract it to a permanent folder (for exampleC:\src\flutteron Windows or~/development/flutteron macOS/Linux). -
Add the SDK's
binfolder to your systemPATH:# macOS / Linux — add to ~/.zshrc or ~/.bashrc export PATH="$PATH:$HOME/development/flutter/bin" # Windows — add via System Environment Variables # Add the full path to flutter\bin, e.g. C:\src\flutter\bin
- Restart your terminal (or editor) so the updated
PATHtakes effect. -
Verify the setup and install any missing platform tools it flags:
flutter doctor
- Resolve anything
flutter doctormarks with an ✗ (Android SDK, Xcode, CocoaPods, etc.) before continuing — the project won't build correctly until every relevant check passes.
- Download the Flutter SDK for your OS from
-
Fetch the project dependencies from the project root:
flutter pub get
- Make sure a simulator, emulator, or physical device is connected and available.
-
Run the app:
flutter run
-
Optional — validate the project before making changes:
flutter analyze
flutter test
flutter pub get — just run flutter doctor first to confirm your existing SDK version matches this project's sdk: ^3.9.2 requirement.
Production Build Guide
Before creating a release build, replace demo branding, set your final app identifier, test on real devices, and connect any production backend services you need.
Android Release Build
- Open
android/app/build.gradle.ktsand confirm your finalnamespace,applicationId,compileSdk,targetSdk,versionCode, andversionName. - Create a release signing key if you do not already have one:
keytool -genkey -v -keystore upload-keystore.jks -keyalg RSA -keysize 2048 -validity 10000 -alias upload
- Configure Android release signing in your normal Flutter/Android workflow. Keep passwords and keystore files private and do not share them with buyers or public repositories.
- Clean the project and download packages:
flutter clean
flutter pub get
- Run a quick quality check:
flutter analyze
flutter test
- Build the Android App Bundle for Play Store upload:
flutter build appbundle --release
- The generated release file is usually available at
build/app/outputs/bundle/release/app-release.aab. - If you need a direct install APK for testing, run:
flutter build apk --release
iOS Release Build
- Use macOS with Xcode installed and an active Apple Developer account.
- Open
ios/Runner.xcworkspacein Xcode. - Select the
Runnertarget and confirm the bundle identifier, display name, team, signing certificate, and provisioning profile. - From the project root, clean and install packages:
flutter clean
flutter pub get
- Build the iOS release:
flutter build ios --release
- To create an App Store archive, open Xcode and choose
Product > Archive, then upload the archive from Xcode Organizer. - Alternatively, create an IPA with Flutter:
flutter build ipa --release
- The generated IPA is usually available under
build/ios/ipa/.
Project Structure
lib/app.dart
Main app entry flow, launch coordinator, navigation shell, and default controller wiring.
lib/main.dart
Starts the Flutter app and launches GroceryApp.
lib/theme/app_theme.dart
Global colors, text styles, buttons, chips, and input styling.
lib/screens/
Contains the customer app UI screens grouped by feature.
lib/controllers/app_controller.dart
Central app state for products, categories, cart, wishlist, loading, and errors.
lib/services/ and lib/repositories/
Service and repository layers used for backend-ready data flow.
lib/data/mock_data.dart
Demo data source used by the mock API implementation.
assets/images/products/
Local product images used by the UI preview and demo catalog.
Navigation Flow Map
Basketly starts with the launch and authentication flow, then opens the customer shell with five main tabs. Secondary screens are opened from those tabs as needed.
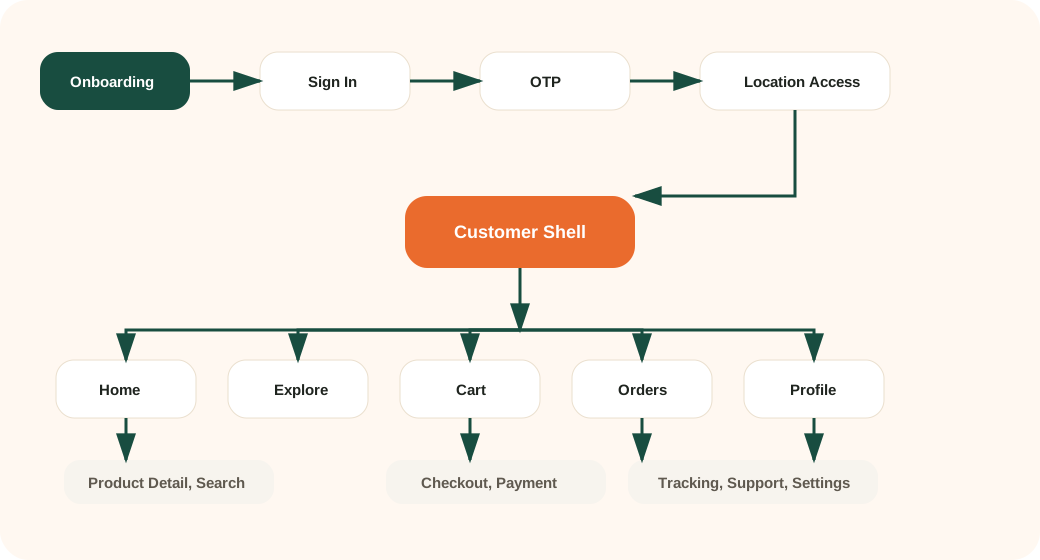
Home, Explore, Cart, Orders, and Profile. Supporting flows include search, product detail, checkout, payment, coupons, tracking, addresses, support, and settings.
Customization Guide
1. Change the App Name
The visible app title inside Flutter is currently set in lib/app.dart:
title: 'Basketly'
For store-ready publishing, also update the Android and iOS display names and identifiers using your preferred Flutter rename workflow before release.
2. Change Colors and Typography
Global design tokens live in lib/theme/app_theme.dart. Update these values to match your own brand:
AppTheme.accentfor primary action colorAppTheme.canvasfor overall app backgroundAppTheme.surfaceandAppTheme.surfaceMutedfor cards and chipsGoogleFonts.plusJakartaSansusage if you want a different font family
3. Change Product Images
Replace the demo product images inside assets/images/products/ and keep the file paths updated in your product data source or API payload.
4. Change Demo Content
If you are still using the mock setup, update demo content in:
lib/data/mock_data.dartlib/services/mock_store_api_service.dart
Logo, Splash Screen, and Display Name
This section is written for non-technical buyers who only need to replace the visible app branding before handing the project to a developer or publishing team.
1. Update the Display Name
- For Android, open
android/app/src/main/AndroidManifest.xml. - Find
android:label="Basketly"and replaceBasketlywith your app name. - For iOS, open
ios/Runner/Info.plist. - Update
CFBundleDisplayNameandCFBundleNameto your app name. - In Flutter, open
lib/app.dartand updatetitle: 'Basketly'.
2. Update the App Logo
- Prepare a square logo image, preferably at least
1024x1024pixels. - Replace Android launcher icons inside
android/app/src/main/res/mipmap-*/. - Replace iOS app icons inside
ios/Runner/Assets.xcassets/AppIcon.appiconset/. - Keep the existing filenames and icon sizes unless your developer regenerates the icon set with a Flutter icon tool.
- Run the app on Android and iOS to confirm the new icon appears on the device home screen.
3. Update the Splash Screen
- For Android, update the launch background files in
android/app/src/main/res/drawable/launch_background.xmlandandroid/app/src/main/res/drawable-v21/launch_background.xml. - For iOS, open
ios/Runner/Base.lproj/LaunchScreen.storyboardin Xcode and replace the launch screen artwork or colors. - Keep the splash screen simple because it only appears while Flutter is starting.
- After changing splash assets, run
flutter clean, thenflutter pub get, and test again on a real device or simulator.
4. Update the Package Name
com.basketly.appReplace it everywhere below with your own reverse-domain identifier (for example
com.yourcompany.yourapp) before publishing.
The package name (also called the application ID on Android and the bundle identifier on iOS) has to be changed in a few places so Android, iOS, and your Flutter code all agree.
-
Easiest option — use a rename tool. From the project root, run:
dart pub global activate rename
rename setBundleId --value "com.yourcompany.yourapp" --targets android,ios
This updates the AndroidapplicationIdand the iOSPRODUCT_BUNDLE_IDENTIFIERin one step. -
Manual option — Android. Open
android/app/build.gradle.ktsand replace both thenamespaceandapplicationIdvalues (currentlycom.basketly.app) with your new package name. -
If your Android project still has a Kotlin/Java source path matching the old package (for example
android/app/src/main/kotlin/com/basketly/app/MainActivity.kt), moveMainActivity.ktinto a folder path that matches your new package name, and update thepackagedeclaration at the top of that file to match. -
Confirm
android/app/src/main/AndroidManifest.xmldoes not hardcode the old package name anywhere (most templates read it frombuild.gradle.ktsautomatically, but double-check custom entries such as deep links or provider authorities). -
Manual option — iOS. Open
ios/Runner.xcworkspacein Xcode, select theRunnertarget, open the General tab, and replace the Bundle Identifier (currentlycom.basketly.app) with your new package name. -
After changing the package name, run
flutter clean, thenflutter pub get, and do a freshflutter runto confirm both platforms build under the new identifier before you create a release build. - Keep the Flutter app title, the display name, and the store-facing package name aligned so your builds remain easy to manage.
Backend Integration
Basketly is already structured to support backend implementation. The current default flow uses a mock repository and a mock API service, but the architecture is ready for a real data source.
Current Architecture
The UI layer talks to the controller, which uses the repository contract, and that repository calls the service layer for data. This keeps the screens clean while making it simple to swap the mock implementation for your own backend.
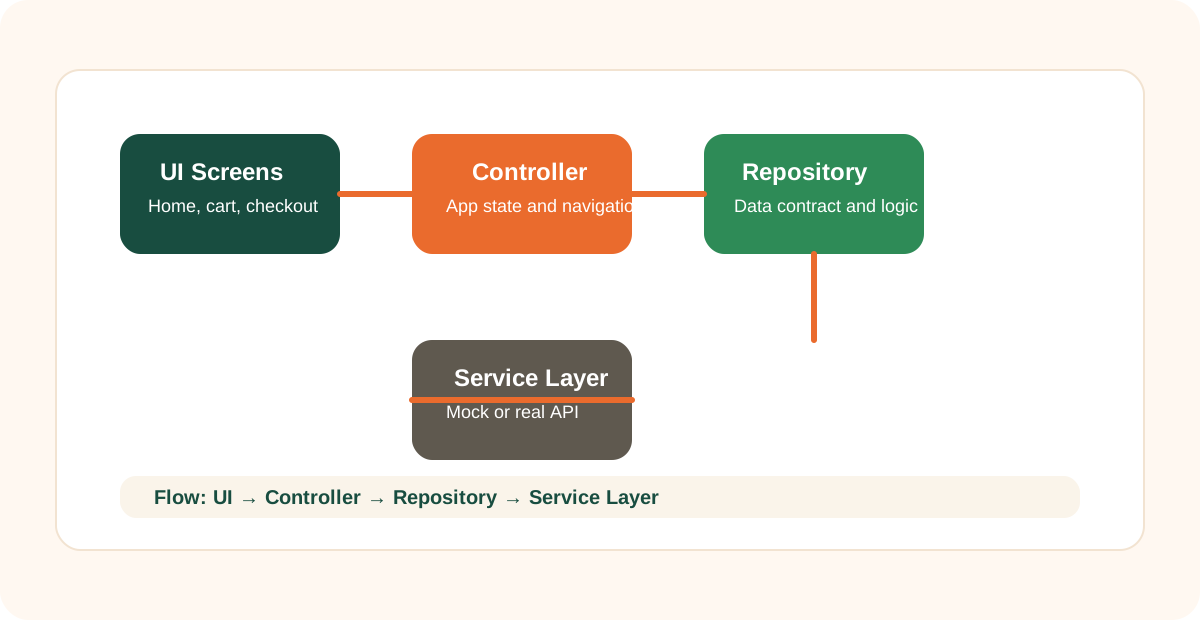
| Layer | File | Purpose |
|---|---|---|
| Controller | lib/controllers/app_controller.dart |
Manages products, categories, cart, wishlist, loading state, and error state. |
| Repository contract | lib/repositories/store_repository.dart |
Defines the data operations used by the app. |
| API service contract | lib/services/store_api_service.dart |
Defines the service methods expected from your backend connection. |
| Mock implementation | lib/services/mock_store_api_service.dart |
Supplies demo data while the app is not connected to a real backend. |
| Default wiring | lib/app.dart |
Creates the default AppController with the mock repository. |
How to Connect Your Own Backend
- Create your own API service class implementing
StoreApiService. - Connect it to your repository implementation.
- Pass that repository into
AppController. - Inject the controller into
GroceryAppor replace the default factory inlib/app.dart.
abstract interface class StoreApiService {
  Future<List<Map<String, dynamic>>> fetchProducts();
  Future<List<String>> fetchFeaturedCategories();
  Future<Map<String, int>> fetchCartQuantities();
  Future<List<String>> fetchWishlistIds();
  Future<void> updateCartItem({
    required String productId,
    required int quantity,
  });
  Future<void> clearCart();
  Future<void> toggleWishlist(String productId);
}
Backend / Server Troubleshooting
This item does not include a ready-made backend or server. If you connect Basketly to your own API and run into issues, use the checks below to identify the most common integration problems.
1. The app still shows demo products instead of live data
- Confirm your app is no longer using
MockStoreApiService. - Make sure your repository is wired to your real
StoreApiServiceimplementation. - Check the default controller creation in
lib/app.dartand verify the mock repository has been replaced.
2. API requests fail immediately
- Verify your base URL, endpoint paths, headers, and authentication tokens.
- Make sure your backend server is online and reachable from the test device or emulator.
- If you are testing locally, confirm the emulator or simulator can access your local machine or test server.
- Review console logs for HTTP status codes such as
401,403,404, or500.
3. Data loads, but the UI looks empty or incomplete
- Check that your API response keys match the fields expected by your repository and models.
- Confirm product IDs, image paths, prices, and category values are present and not null.
- Verify that image URLs or local asset references are valid.
4. Cart or wishlist updates do not persist
- Confirm your backend implements the write methods used by the app such as
updateCartItem,clearCart, andtoggleWishlist. - Check whether your API requires a logged-in user, session, or authorization header for write operations.
- Make sure the backend returns success responses after updates and that the app refreshes state afterward.
5. Live tracking, payments, or notifications are not working
- These features require your own backend logic and, in many cases, third-party services or SDKs.
- For example, live tracking may need a maps provider and location updates, while payments may need a payment gateway account and secure server-side processing.
- If those services are not yet integrated, the UI can still be used as a front-end template.
Backend / Server FAQ
Does this purchase include a backend or admin panel?
No. This item is a Flutter customer app UI template only. A production backend, database, admin panel, delivery app, payment server logic, and live operations system are not included.
Why is there a backend-related folder structure if no backend is included?
The project includes repository and service layers so buyers can connect the UI to their own backend more easily. These files provide an integration-ready structure, not a hosted server product.
Is mock data included?
Yes. The template ships with mock data and a mock API service so the UI works out of the box for preview, testing, and customization before real backend integration.
Can I connect this template to REST API, Firebase, Supabase, or a custom server?
Yes. You can replace the mock service layer with your own implementation and map the returned data into the app's repository and controller flow.
Are authentication, payment, and order tracking fully functional by default?
No. Their UI flows are included, but production functionality depends on your own backend, business rules, third-party services, and integration work.
What support is covered for backend questions?
Support can help explain the existing Flutter file structure and where backend integration should happen. Full backend development, deployment, database design, server maintenance, and third-party account setup are outside the scope of a UI template unless agreed separately.
Included Screens
Authentication and Launch
Onboarding, Sign In, Sign Up, OTP Verification, Forgot Password, Location Permission
Shopping Flow
Home, Catalog, Search, Search Results, Product Detail, Wishlist, Notifications
Purchase Flow
Cart, Checkout, Coupons, Payment Methods, Order Success
Order Management
Orders, Order Detail, Live Tracking
Account Tools
Profile, Edit Profile, Address List, Address Form, Settings
Support
Support Screen and Chat Support Screen
Full Screen List
- Onboarding Screen
- Sign In Screen
- Sign Up Screen
- OTP Verification Screen
- Forgot Password Screen
- Location Permission Screen
- Home Screen
- Catalog Screen
- Search Screen
- Search Results Screen
- Product Detail Screen
- Wishlist Screen
- Notifications Screen
- Cart Screen
- Checkout Screen
- Address List Screen
- Address Form Screen
- Payment Methods Screen
- Coupons Screen
- Order Success Screen
- Orders Screen
- Order Detail Screen
- Live Tracking Screen
- Profile Screen
- Edit Profile Screen
- Support Screen
- Chat Support Screen
- Settings Screen
Assets and Images
Product images used in the template are stored in assets/images/products/. If you replace them, keep filenames and paths aligned with the data used in your app.
Release Notes for Buyers
- This package is a Flutter customer app UI template.
- It is suitable for Android and iOS Flutter projects.
- The app currently uses mock data by default.
- You should connect your own backend before production deployment.
- You should replace demo branding, package identifiers, store listing assets, and any sample content before release.
Support
If you need help with setup, basic customization guidance, or understanding the file structure after purchase, you can contact support here:
Support scope usually covers template setup guidance and basic usage help. Custom backend development, third-party service configuration, and major feature development are normally separate work unless agreed otherwise.